Revolutionize Your AI Game: Master the Art of Deploying Machine Learning Models Like a Pro!
A Comprehensive Guide to Effective Deployment Strategies
Deploying machine learning models is a crucial step in bringing your innovative solutions to life, but it can sometimes feel like a daunting task. Fear not! In this article, I unveil the ultimate secrets to deploying machine learning models like a pro.
Whether you’re serving a small audience or aiming for massive scalability, I’ve got you covered. Get ready to revolutionize your AI game as we explore the most effective and cutting-edge ways to deploy your machine learning models. From local deployments to cloud-based solutions, containerization to serverless architectures, we leave no stone unturned. Buckle up and prepare for a journey that will unlock the true potential of your machine learning models. Get ready to witness the magic of deployment!
Table of contents:
- Local deployment
- Batch processing
- Serverless deployment
- Containerization and Orchestration deployment
- Personel anectode
- Summary
- References
1. Local deployment
Local deployment of a machine learning model refers to the process of hosting and running the model on a local machine or infrastructure within an organization’s premises. It involves setting up the necessary software and hardware resources to deploy and serve the model predictions locally.
In local deployment, the machine learning model is typically loaded onto a local server or computing device. This can be a dedicated machine, a cluster of machines, or even individual devices like desktop computers, laptops, or edge devices. The deployment setup allows the model to receive input data, process it, and generate predictions without relying on external servers or cloud infrastructure.
By deploying the model locally, organizations have full control over the deployment environment, including the choice of hardware, software dependencies, and network configurations. This level of control can be beneficial in scenarios where data privacy, reduced latency, customization, or compliance with specific regulations is crucial.
Local deployment is commonly used in applications where real-time predictions or low-latency responses are required. It allows companies to leverage the computational power available on their premises and serve predictions quickly, without relying on internet connectivity or external infrastructure.
However, it’s important to note that local deployment may have limitations in terms of scalability, resource constraints, maintenance overhead, and accessibility compared to cloud-based or server-based deployments. These considerations need to be taken into account when deciding on the most suitable deployment strategy for a specific use case.
Here’s a step-by-step guide on how to locally deploy a machine learning model:
Step 1: Prepare your Machine Learning Model
- Train and finalize your machine learning model using your preferred framework (e.g., scikit-learn, TensorFlow, PyTorch).
- Optimize the model’s performance and accuracy by fine-tuning hyperparameters and conducting thorough testing and validation.
Step 2: Install Dependencies
- Ensure that you have the necessary dependencies installed. This typically includes Python and relevant libraries for machine learning, such as scikit-learn, TensorFlow, or PyTorch. Use package managers like pip or conda (recommended) to install these dependencies.
Step 3: Set up a Development Environment
- Create a development environment to isolate your project and its dependencies. You can use tools like virtualenv or conda (recommended) environments to manage your project-specific environment.
Step 4: Save the Model
- Save your trained model in a format compatible with your chosen framework. Common formats include .pickle, .h5, .pb, or .pt, depending on the framework you’re using. This serialized model will be loaded and used during deployment.
Step 5: Build a Predictive Function
- Create a Python function that loads the serialized model and defines the prediction logic. This function should take input data as parameters, preprocess the data (if required), and return the model’s predictions.
Step 6: Create an API Endpoint
- Use a lightweight web framework like Flask or FastAPI to build a web server that exposes an API endpoint for making predictions. Define a route that accepts incoming requests and calls the predictive function, returning the predictions as a response.
Step 7: Test Locally
- Run your local server and test it with sample data to ensure that the model is making accurate predictions. Validate the results against expected outcomes and make any necessary adjustments to improve performance.
Step 8: Deploy the Local Server
- Once you’re satisfied with the local testing, you can deploy the server to make it accessible to others on your local network or specific devices. This can involve running the server on a specific IP address and port or using tools like ngrok to create a temporary public URL for testing purposes.
Step 9: Document and Share
- Document the usage of your deployed model, including any necessary input data format and expected outputs. Share the documentation with others who will be using or consuming your deployed model.
Congratulations! You have successfully deployed your machine learning model locally. Users can now send requests to your API endpoint and receive predictions from your model. Remember to update and retrain your model as needed to ensure its accuracy and relevance over time.
2. Batch Processing
Batch processing deployment of a machine learning model refers to the approach of running the model on a batch or a large set of input data rather than making real-time predictions. In this deployment mode, the model processes data in batches, typically in an offline or non-real-time manner.
In batch processing deployment, the input data is collected, preprocessed, and then fed into the model for prediction in a batch-oriented fashion. Typically this requires a set of tools that can manage your workflow or failed jobs. For simpler workflow AWS Step Functions are a great solution, and for more complex workflows tools like Apache Airflow (used with dbt), Dagster or Kubeflow (if you already are in Kubernetes ecosystem) are currently hot in the market.
The model performs inference on the entire dataset at once, generating predictions for each data point in the batch. The results are often stored in a persistence database or used for further analysis, reporting, or decision-making.
This deployment mode is commonly used when real-time predictions are not necessary or feasible. It is particularly suitable when dealing with large volumes of data that can be processed offline or in batches. Examples of batch processing deployments include data analytics, recommendation systems, fraud detection, or generating insights from historical data.
The benefits of batch processing deployment include:
- Efficiency: By processing data in batches, the model can leverage parallel processing and optimize resource utilization, leading to efficient use of computational resources.
- Scalability: Batch processing allows for scaling the deployment by distributing the workload across multiple machines or clusters, enabling efficient processing of large datasets.
- Cost-effectiveness: Running the model in batch mode can be cost-effective as it eliminates the need for real-time infrastructure and reduces the operational costs associated with continuous serving and monitoring.
However, batch processing deployment also has some considerations:
- Delayed predictions: Since the model operates on batches of data, predictions are not available immediately. There is a time delay between data collection and obtaining the predictions, which may not be suitable for time-sensitive applications.
- Data staleness: In some cases, the batch data may become stale or outdated by the time the predictions are generated. This can impact the freshness and relevance of the predictions, especially for recommendation systems.
- Data processing requirements: Batch processing deployments require infrastructure and resources capable of handling large datasets efficiently. Preprocessing, data storage, and management need to be considered to ensure smooth execution.
Batch processing deployment is a valuable approach when real-time predictions are not critical and processing large amounts of data in a time-efficient and cost-effective manner is the primary objective.
To deploy a machine learning model for batch processing, follow these steps (along with examples of popular tools that can be used):
- Prepare and Train the Model:
Use popular machine learning frameworks like scikit-learn, TensorFlow, or PyTorch to train and optimize your model. For example, scikit-learn provides a wide range of algorithms for various tasks, TensorFlow is well-suited for deep learning models, and PyTorch offers flexibility and ease of use. - Data Preprocessing:
Utilize libraries like pandas or Apache Spark for data preprocessing tasks. For example, pandas provides efficient data manipulation capabilities, while Apache Spark offers distributed data processing for large-scale datasets. - Set Up the Batch Processing Environment:
Use tools like Apache Hadoop, Apache Spark, or cloud-based services such as Amazon EMR or Google Cloud Dataproc to set up the batch processing environment. These tools enable distributed processing and handle large-scale data processing efficiently. - Develop Batch Processing Pipeline:
Leverage workflow management tools like Apache Airflow or Luigi to design and orchestrate the batch processing pipeline. These tools provide features for task scheduling, dependency management, and monitoring of the pipeline. - Implement Model Inference:
Depending on the framework used, integrate the trained model into the batch processing pipeline. For example, if you’re using scikit-learn, you can use the model’spredictmethod to generate predictions on the batch data. - Result Storage and Output Handling:
Store the generated predictions or results in a suitable format or storage system. Tools like Apache Parquet, Apache Avro, or databases like Apache HBase or PostgreSQL can be used for efficient data storage and retrieval. - Testing and Validation:
Validate the batch processing pipeline by running it on a subset of the data or a small test dataset. Use tools like pytest or unit testing frameworks specific to your chosen technologies to ensure the correctness of the pipeline. - Execution and Monitoring:
Execute the batch processing pipeline using the chosen tool or framework. Monitor the progress and resource utilization using tools like Apache Hadoop’s JobTracker or Apache Spark’s web UI for job monitoring. - Iteration and Maintenance:
Regularly update and improve the deployed model as new data becomes available or as the model’s performance requires enhancement. Monitor and manage the batch processing pipeline to ensure it remains efficient and error-free.
Example Toolchain:
- Model Training: scikit-learn, TensorFlow, PyTorch
- Data Preprocessing: pandas, Apache Spark
- Batch Processing Environment: Apache Hadoop, Apache Spark, Amazon EMR, Sagemaker Pre-processing, Google Cloud Dataproc
- Workflow Management: Apache Airflow, Luigi, Dagster, Kubeflow
- Result Storage: Apache Parquet, Apache Avro, Apache HBase, PostgreSQL, ClickHouse or other persistent storage of your choice
- Testing and Validation: pytest, unit testing frameworks
By following these steps and utilizing the mentioned tools, you can deploy a machine learning model for batch processing efficiently and effectively. These tools help streamline the process and provide robust features for building and managing the batch processing pipeline.
Now let’s move on to more exciting deployments.
3. Serverless deployment
Serverless deployment of a machine learning model refers to a deployment approach where the model is hosted and served without the need for managing or provisioning traditional server infrastructure. In this deployment mode, the model is deployed as a function or a service (AWS Lambda or Azure Functions), and the underlying infrastructure is abstracted away, handled by a cloud provider or a serverless computing platform.
In serverless deployment, the machine learning model is typically encapsulated within a function or service that is triggered by specific events or requests. When a prediction request is made, the serverless platform automatically provisions the necessary computing resources to execute the function, runs the model inference, and returns the prediction result to the requester.
Key characteristics and benefits of serverless deployment for machine learning models include:
- Scalability: Serverless platforms automatically scale the computing resources based on demand, ensuring the model can handle varying workloads and accommodate sudden spikes in traffic without manual intervention.
- Cost Efficiency: With serverless deployment, you pay only for the actual usage of the model function or service. Since the infrastructure is managed by the provider and scales dynamically, you are not charged for idle resources, resulting in cost savings.
Also checkout The Unfulfilled Promised of Serverless. - Operational Simplicity: Serverless platforms handle infrastructure management, automatic scaling, and fault tolerance, relieving developers from the burden of infrastructure setup, monitoring, and maintenance tasks.
- Easy Integration: Serverless deployments can be easily integrated with other serverless functions, APIs, or services, enabling seamless integration into larger workflows or applications.
- Rapid Development and Deployment: Serverless platforms offer streamlined development and deployment workflows, allowing for faster iteration and reduced time-to-market for deploying machine learning models.
However, it’s important to consider some limitations and challenges of serverless deployment:
- Cold Start Latency: Serverless functions may experience latency when invoked for the first time or after being idle for a certain period. This can impact real-time applications that require low-latency responses.
- Resource Constraints: Serverless platforms impose limitations on compute resources, memory, and execution time. Models with large memory requirements or long execution times may need to be optimized or split into smaller functions.
- Dependency Management: Managing dependencies and libraries within the serverless environment can be challenging, as different platforms may have limitations on the supported libraries or require additional configuration.
- Vendor Lock-In: Serverless deployments may tie you to a specific cloud provider or serverless platform, limiting flexibility and portability if you decide to switch providers or platforms.
Serverless deployment provides a flexible and cost-effective approach for deploying machine learning models, allowing developers to focus on building and iterating their models while abstracting away infrastructure management. It is particularly suitable for applications with variable workloads, sporadic requests, and where operational simplicity and cost optimization are key considerations.
To deploy a machine learning model on a serverless deployment, follow these steps:
- Preprocess and Package the Model:
- Prepare your machine learning model for deployment by saving it in a format compatible with the serverless platform you’re using (e.g., TensorFlow SavedModel, ONNX, or serialized scikit-learn model).
- Ensure that any dependencies or libraries required by the model are packaged along with it. This may involve creating a requirements.txt file or using tools like pipenv or conda environments.
2. Choose a Serverless Platform:
- Select a serverless platform that supports deploying machine learning models. Examples include AWS Lambda, Google Cloud Functions, or Azure Functions.
- Consider factors such as ease of integration, supported programming languages, runtime environment, and scalability capabilities when choosing the platform.
3. Create a Serverless Function:
- Create a serverless function or service that will serve as the entry point for invoking the model. This function should receive input data, preprocess it if necessary, and invoke the machine learning model for inference.
4. Deploy the Function:
- Use the chosen serverless platform’s deployment mechanism to deploy the function and associated resources.
- This typically involves using command-line tools, SDKs, or a web interface provided by the platform. For example, with AWS Lambda, you can use the AWS CLI or AWS Management Console to deploy the function.
5. Configure Triggers and Event Sources:
- Configure triggers or event sources that will invoke the serverless function when a prediction request is made. This could be an HTTP Endpoint, HTTP request, a message from a queue, or a file uploaded to a storage service (S3 triggers).
- Set up the necessary permissions and access controls to ensure secure and authorized access to the function.
6. Test the Deployment:
- Validate the deployment by sending sample prediction requests to the serverless function and verifying the expected output.
- Monitor and troubleshoot any errors or issues that arise during testing.
7. Monitor and Scale:
- Utilize the monitoring and logging features provided by the serverless platform to track the function’s performance, execution logs, and resource utilization.
- Configure auto-scaling options to handle varying workloads and ensure the function can scale to meet demand.
8. Iteration and Maintenance:
- Regularly update and retrain the deployed model as new data becomes available or to improve its performance.
- Monitor the function’s performance and analyze feedback to identify any necessary optimizations or enhancements.
Example Platforms:
- AWS Lambda: Use AWS Lambda along with other services like Amazon S3 for data storage and retrieval, or Amazon API Gateway for creating RESTful APIs. Here is a sample code for your machine learning model deployment on AWS Lambda using bibucket pipelines:
There are three steps, 1. Build lambda, that will install all your dependicies and take your model file, zip everything and push it to a S3 bucket called my-serverless-model . 2. Update lambda, where we use bibucket pipes (that are simply docker images) to point to our code in S3 bucket and update that in our function. 3. Test lambda, where run-tests.sh should test the endpoints to see if it works (you may want to add a variable wait=True for that to work correctly).
Contents of your build-lambda.sh file might look like this:
#!/bin/bash
apt-get update -y && apt-get upgrade -y && apt-get install -y zip
zip -r my-mlmodelv1-code.zip.zip ./*- Google Cloud Functions: Deploy machine learning models on Google Cloud Functions, integrating with Google Cloud Storage or Google Cloud Pub/Sub for data and event handling.
- Azure Functions: Utilize Azure Functions in conjunction with Azure Blob Storage or Azure Event Grid for data storage and triggering events.
By following these steps and using the appropriate serverless platform and associated services, you can deploy your machine learning model on a serverless infrastructure, enabling efficient and scalable prediction serving.
4. Containerization and Orchestration deployment
Containerization and orchestration deployment of a machine learning model involves packaging the model and its dependencies into a containerized format and then using orchestration tools to manage and deploy the containerized application. This approach provides a consistent and portable deployment environment for the model, along with the ability to scale and manage the deployment efficiently.
Here’s a breakdown of the key components:
- Containerization:
- Containerization involves encapsulating the machine learning model, its dependencies, and the necessary runtime environment into a container image. A container image includes the code, libraries, and system dependencies required to run the model consistently across different environments.
- Docker is a popular tool used for containerization, allowing you to create a portable and isolated container image containing the model and its runtime dependencies. Other containerization technologies like Podman, containerd, or rkt can also be used.
2. Orchestration:
- Orchestration involves managing and deploying containerized applications efficiently using orchestration tools. These tools handle the coordination and scaling of containers across a cluster of machines.
- Kubernetes is the most widely used orchestration platform for deploying containerized applications. It enables automatic scaling, load balancing, self-healing, and management of containers across multiple nodes in a cluster. Other orchestration tools include Docker Swarm (which I recommend if you are just starting with orchestration), Apache Mesos (more like an operating system for cloud), or Nomad (more general purpose than Kubernetes).
3. Deployment Workflow:
- The deployment workflow typically involves building the container image with the model and its dependencies, pushing the image to a container registry (e.g., Docker Hub, Google Container Registry (now artifact registry), or AWS Elastic Container Registry), and then deploying and managing the containers using the orchestration tool.
- The orchestration tool takes care of scheduling containers onto available resources, scaling the number of containers based on demand, managing networking and storage, and monitoring the health of the containers.
Benefits of Containerization and Orchestration Deployment for Machine Learning Models:
- Portability: Containerization provides a consistent environment across different platforms and infrastructure, making it easy to deploy the model on-premises, in the cloud, or in hybrid environments.
- Scalability: Orchestration tools like Kubernetes enable dynamic scaling of containers based on workload demands, ensuring efficient resource utilization and handling spikes in traffic.
- Isolation: Containers provide isolation between the model and the host environment, preventing conflicts between dependencies and simplifying deployment across various environments.
- Reproducibility: Container images capture the entire runtime environment of the model, ensuring reproducibility and eliminating the “works on my machine” problem.
- Flexibility: Containerization and orchestration enable seamless integration with other microservices, databases, or streaming platforms, allowing for building complex machine learning pipelines.
- Resource Efficiency: Orchestration tools optimize resource allocation by scheduling containers based on available resources and scaling them down during low demand periods.
Containerization and orchestration deployment is well-suited for deploying machine learning models in production scenarios where scalability, portability, and management of the deployment are essential and also where your organization already has the technical know-how to manage a micro-service. It simplifies the deployment process, enhances reproducibility, and provides a robust infrastructure for managing and scaling machine learning applications.
To deploy a machine learning model on a Kubernetes or Docker environment, you can follow these steps along with code samples:
- Containerize the Machine Learning Model:
- Create a Dockerfile to define the container image. Here’s an example for a Python-based machine learning model using Flask as the web framework:
If you are wondering, this is the code of ourapp.py file:
All the code can be copied from this public bitbucket repository: https://bitbucket.org/jbg95866/playk8s/src/main/
2. Build and Push the Container Image:
- Build the Docker image using the Dockerfile by running the following command in the terminal:
docker build -t <YOUR_FAV_TAG>:<IMAGE_VERSION> . - Push the built image to a container registry. Replace
your-registrywith the actual registry address:
docker tag <YOUR_FAV_TAG>:<IMAGE_VERSION> <your-registry>/<YOUR_FAV_TAG>:<IMAGE_VERSION>
docker push <your-registry>/<YOUR_FAV_TAG>:<IMAGE_VERSION>
3. Create a Kubernetes Deployment:
- Define a Kubernetes Deployment manifest (e.g.,
deploy.yaml) that describes the deployment configuration. Here's an example:
apiVersion: apps/v1
kind: Deployment
metadata:
  name: hello-playk8s
spec:
  replicas: 3
  selector:
    matchLabels:
      app: playk8s
  revisionHistoryLimit: 5
  progressDeadlineSeconds: 300
  minReadySeconds: 10
  strategy:
    type: RollingUpdate
    rollingUpdate:
      maxUnavailable: 1
      maxSurge: 1
  template:
    metadata:
      labels:
        app: playk8s
    spec:
      containers:
      - name: playk8s
        image: jkayrsjioaoxtstaza/playk8s:prod-0.1.13
        ports:
        - containerPort: 5000
We give our deployment name as hello-playk8s , for replica sets we ask for 3 replicas to be running at all times, and it should match with pods that have names as playk8s , our deployment strategy is RollingUpdate, and in the template spec we give our app a name, and in container spec, we define the image name in the format of <your-repository>/<YOUR_FAV_TAG>:<IMAGE_VERSION>. And it is accessed at port 5000, which matches with our entrypoint in our Dockerfile above.
This is a standard (more of less) K8s deployment api yaml.
4. Add the Deployment as a Service:
- Create a Kubernetes Service manifest to expose the deployment:
apiVersion: v1
kind: Service
metadata:
  name: playk8s-svc
  labels:
    app: playk8s
spec:
  type: NodePort
  ports:
  - port: 8080
    targetPort: 5000
    nodePort: 30001
  selector:
    app: playk8s
Our service called playk8s-svc is set to match with app that has selector label of playK8s , and it is NodePort service i.e. a port in the range of 30000–32767 that will be open in each node and can be accessed from the host for our example. The target port in ports spec is the port at which our app is accessibile.
We are using NodePort for this example, you may want to use a LoadBalancer or Ingres service for you production environments.
Your final deploy.yaml file:
- Apply the Deployment to the Kubernetes cluster (from the same directory as your
deploy.yamlis in:
kubectl apply -f deploy.yaml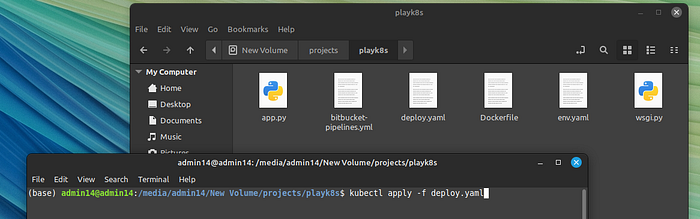
5. Access the Machine Learning Model:
- After the Deployment and Service are created, you can access the machine learning model by retrieving the IP of the cluster (since I was using minikube, I wanted the IP at which minikube is running):
minikube ip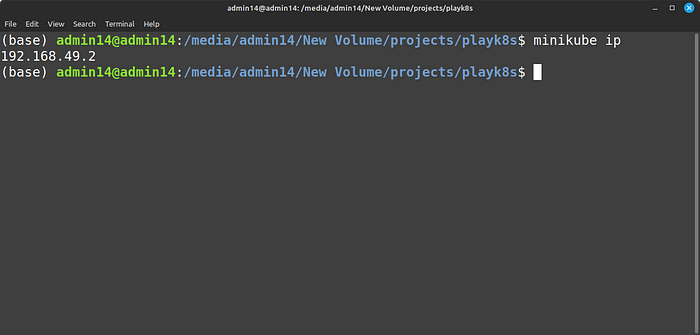
Depending on the service you used, you may want to get the IP of that service:
kubectl get services ml-model-service- Use the IP with the node port (which we mentioned as the
nodePortin thespecof ourplayk8s-svcindeploy.yamlfile, to receive predictions from our machine learning model.

And you can verify that you have three pods running
- Either using kubectl apis:
kubectl get pods
- Or from the minikube dashboard:
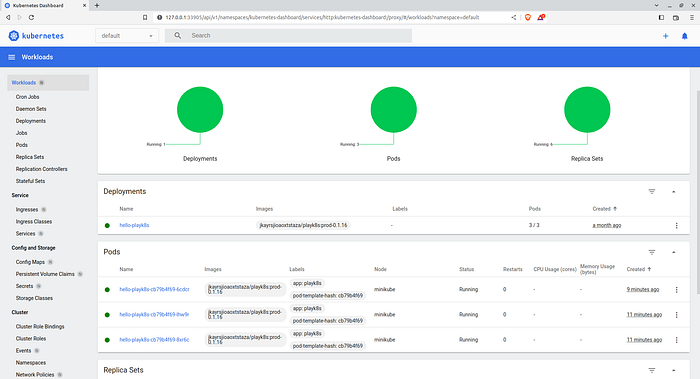
(The 6 replica sets you see in the dashboard are due to me running different versions of same app, hence you may want to use latest tag for your deploy.yaml file instead of bitbucket version number)
For CI/CD you can either use github workflows, bitbucket pipelines or Jenkins. In this example I have used bitbucket pipelines:
We have two types of triggers above, one that runs on every pull request and one that runs of every merge to main branch.
On every PR, we test by building the docker image and lint the dockerfile.
On every merge to main, we build the docker file and publish the image to publick docker repository. All these steps are executed on a self hosted bitbucket runner.
Full code is available here: https://bitbucket.org/jbg95866/playk8s/src/main/
That’s it! You have now deployed your machine learning model on a Kubernetes or Docker environment.
Note: Adjust the code and configuration files according to your specific model and requirements.
Remember to have Docker and Kubernetes installed and properly configured before executing the commands.
After you are done, delete the resources using kubectl delete command:
kubectl delete -f deploy.yaml
Warning
Despite being the hot topic I will discourage you to use K8s (or other COEs) if you are already not using them, because:
You won’t truly appreciate the potential pain, suffering, and anguish caused by a microservice architecture until you have it running in production and serving real traffic
- Sam Newman in his book Building Microservices
Personel anectode
If you are new to deployments, I recommend start with either a fully managed service like AWS Sagemaker or serverless like AWS Lambda. This will ensure that your team’s time is invested into more utilitarian aspects of model development life cycle (MDLC) rather than managing MLOps.
Once the needs outgrow or serverless becomes unfeasible, converting your model to a docker image is a nice step up. You can easily setup an AWS ECS cluster (that works like a Kubernetes control plane) and take full advantage of your containerzed model.
Organizations that already have micro-services (a subset of SOA- Service oriented architecture) in production, or may already use orchestration tools like Kubernetes, are also not advised to rush into packaging models into images. If serverless encapsulates all their SLAs then no need to use more complex workflows.
Having said that, by no means I imply that for every machine learning problem, serverless is the solution. I know teams who just create an AWS Lambda for every problem (because of the knowledge gap). But if you have the technical skill on the team and your problem demands standalone instances, then go with that. And it is such that we’ve explored all possible deployment solutions in this article, barring deployment on edge-devices.
Summary
In this comprehensive article, we delve into the world of machine learning model deployment and explore various techniques to effectively deploy models in real-world applications.
The article provides a detailed overview of different deployment techniques, ranging from local deployment to scalable options. It covers popular approaches such as local deployment on individual machines, cloud-based deployment leveraging Infrastructure as a Service (IaaS) or Platform as a Service (PaaS) solutions, and serverless deployment for efficient scalability and cost-effectiveness.
Furthermore, the article highlights the importance of containerization and orchestration in machine learning model deployment. It delves into the benefits of containerization using Docker and explores orchestration tools like Kubernetes for managing and scaling containerized applications.
Whether you are a data scientist, machine learning engineer, or AI enthusiast, this article serves as a valuable resource for gaining a deeper understanding of various machine learning model deployment techniques and choosing the most suitable approach for your projects. It equips readers with the knowledge needed to deploy models effectively and bring AI solutions to life in a wide range of applications.
Hi 👋, I am Mahesh
I am a Machine Learning Engineer, you can connect with me on LinkedIn: https://www.linkedin.com/in/maheshrajput/
References
- Building Microservices [2nd Edition] — https://www.oreilly.com/library/view/building-microservices-2nd/9781492034018/
- Designing Data-Intensive Applications — https://www.oreilly.com/library/view/designing-machine-learning/9781098107956/
- Machine Learning Design Patterns — https://www.oreilly.com/library/view/machine-learning-design/9781098115777/
- Designing Machine Learning Systems — https://www.oreilly.com/library/view/designing-data-intensive-applications/9781491903063/
- The Kubernetes Book — https://www.amazon.com/Kubernetes-Book-Nigel-Poulton/dp/B09QFM8H6T
- Docker Deep Dive — https://www.oreilly.com/library/view/docker-deep-dive/9781800565135/