Deploy Kubernetes cluster on AWS EC2 instances
Bootstrap single control plane cluster on EC2 instance using kubeadm. Latest version with fix for ‘pod sandbox changed’ error.
Kubernetes, often abbreviated as K8s, has emerged as a pivotal technology in the realm of container orchestration, revolutionizing the deployment and management of applications at scale.

Born out of Google’s internal container orchestration system, Borg, Kubernetes was open-sourced in 2014, quickly gaining widespread adoption for its robust and flexible architecture.
In the era of microservices, where applications are decomposed into smaller, independently deployable units, Kubernetes serves as a powerful orchestrator, providing automated scaling, load balancing, and seamless deployment across distributed environments.
This article explores the steps to deploy a Kubernetes cluster on AWS EC2 instances, unlocking the potential of containerized applications in the dynamic landscape of modern software development.
Why Bootstrap your own K8s Cluster
Bootstrapping your own test Kubernetes cluster on AWS EC2 instances offers a valuable and cost-effective approach for testing microservices, especially when compared to fully-managed services like AWS EKS or Google Cloud Hosted Kubernetes. While managed services provide simplicity and ease of use, there are compelling reasons to consider a DIY approach for testing purposes.
- Customization and Control:
Setting up your Kubernetes cluster allows for greater customization and control over the cluster configuration. This level of control is essential when fine-tuning the environment to match specific testing requirements or when integrating with other tools and services. - Cost Efficiency:
Building and managing your own cluster on EC2 instances can be more cost-effective for testing purposes. Managed Kubernetes services typically come with additional costs (AWS EKS costs $0.20 per hour), and for non-production environments or small-scale testing, these expenses might outweigh the benefits of convenience. - Learning Experience:
Creating your Kubernetes cluster is an excellent learning opportunity for developers and administrators. It provides hands-on experience with the intricacies of Kubernetes architecture, deployment strategies, and troubleshooting, fostering a deeper understanding of the technology. - Offline Testing:
Bootstrapping your cluster allows for testing in offline or air-gapped environments where direct access to managed services may not be feasible. This is crucial for organizations with stringent security and compliance requirements. - No Vendor Lock-In for Testing:
Building your cluster minimizes the risk of vendor lock-in during the testing phase. As your microservices evolve, having the freedom to switch cloud providers or Kubernetes distributions becomes easier without being tied to a specific managed service.
Despite the advantages, bootstrapping your own test Kubernetes cluster on AWS EC2 has its drawbacks like Complexity, Operational Overhead, Potential for Errors, Security Concerns and Man-power skills.
Therefore take it only as one more tool in your arsenal.
Responsible language — The text in this article follows guidelines issued by the Inclusive Naming Initiative which promotes responsible language and tries to avoid harmful terms. As an example, the Kubernetes project has replaced the potentially harmful term “master” with “control plane node”. This articles does the same.
Overview
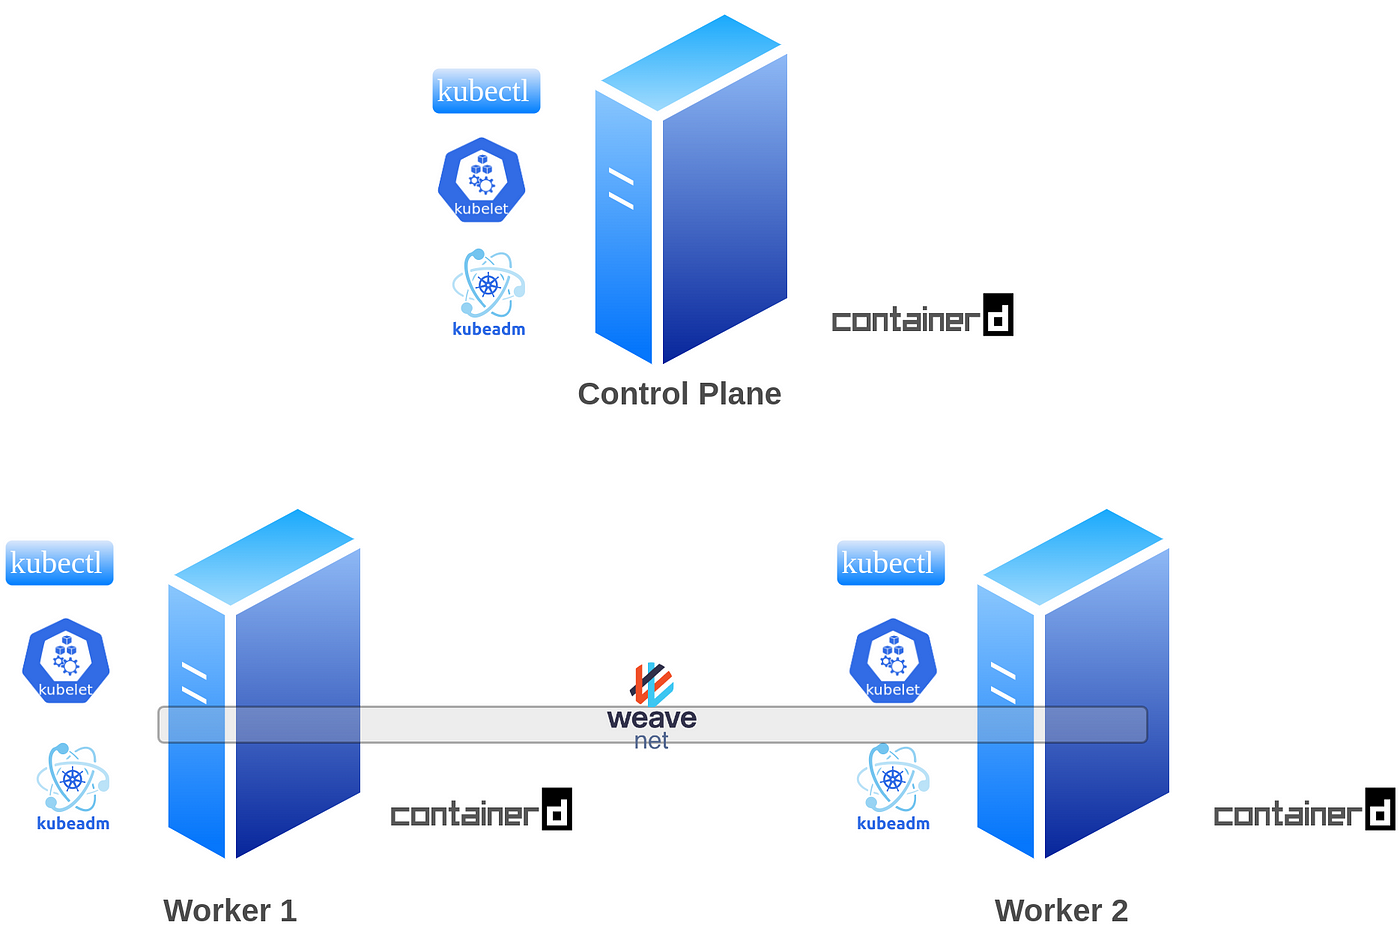
- First, we will create two security groups in the AWS VPC, adding the necessary ports for the control plane and worker nodes.
- Subsequently, we will launch three instances: one for the control plane and two instances as worker nodes. All worker nodes will run Ubuntu 20.04 x84 on
t2.largeand control plane ont2.mediumfeaturing 4GB RAM and 2 vCPUs. Although the official kubeadm installation instructions recommend a Linux Debian or Red Hat-based distribution with at least 2GB RAM and 2 CPUs, we have opted for Ubuntu for our instances. - After launching the instances, we will SSH into the control plane node to disable swap and install the container runtime, kubeadm, kubelet, and kubectl.
- Following this, we will initialize the cluster using the
kubeadm initcommand. - To establish pod networking, we will install the Weave Net Container Network Interface (CNI).
- Additionally, we’ll address the “Pod sandbox changed; it will be killed and re-created” error associated with the
1.29.0-00version, ensuring a smoother operation. Although it’s unclear whether this issue occurred in previous versions, it certainly did not manifest untilv1.24.0-00. - To enhance the cluster’s functionality, we will deploy an Ingress service and subsequently deploy nginx application.
- This application will be invoked via NodePort service on different paths, providing a comprehensive test of the cluster’s capabilities.
Create Security groups
When running Kubernetes in an environment with strict network boundaries, such as on-premises datacenter with physical network firewalls or Virtual Networks in Public Cloud, Kubernetes uses specific ports and protocols.
We will create 2 security groups and add rules for control plane and worker nodes.

In AWS Virtual Private Cloud (VPC), security groups act as virtual firewalls for EC2 instances, controlling inbound and outbound traffic. They function at the instance level, specifying allowed traffic based on rules. Security groups enhance network security within the VPC by permitting or denying traffic based on defined rules for communication between instances and external networks.
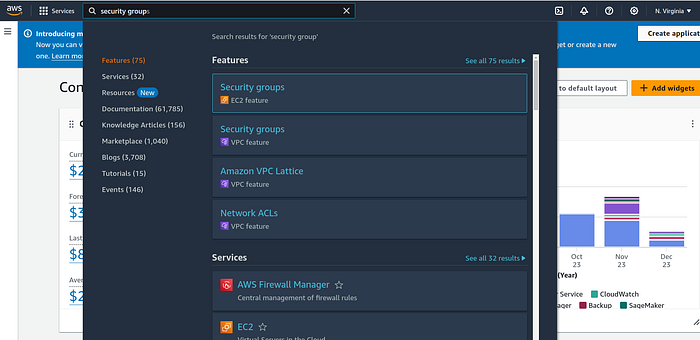
- Login to your AWS account and search Security groups
2. Click on Security groups service and then on the orange “Create security group” button.
3. First we are creating security group for control plane, so under Basic details section enter “control-plane-sg” name for easier identification at the time of instance creation.

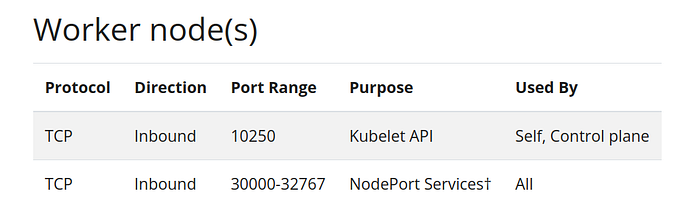
4. Under Inbound rules we will add three rules based on official kubernetes ports and protocols documentation:
- SSH - port 22 so that we can ssh from our local machine to control plane
- TCP - port 6443 for API server that can be access by anyone
- TCP -port range 2379–2380 for etcd database server client API on the private network only
- TCP -port range 10250–10259 for kubelet, kube-scheduler, and kube-controller, also on private network only
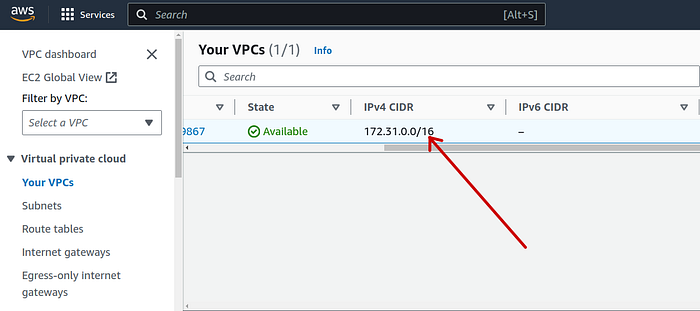
By private network, I mean our source will be the VPC CIDR block. It can be found by going to the VPC service from search menu and scrolling horizontally until you see IPv4 CIDR.
Kubernetes also supports dual stack networking with the options of PreferDualStack and RequireDualStack . But in order to create IPv6 cluster you must have/create a VPC with IPv6 CIDR block enabled.
After you have added all four rules in the security group, it must resemble the below screenshot:
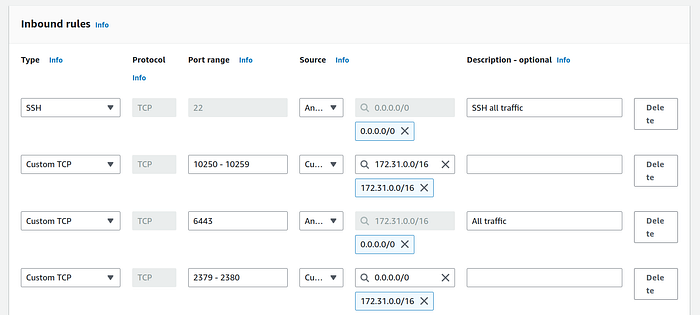
Note: The source for rules with port range 10250–10259 and rule 2379–2380 is the our VPC IPv4 CIDR block. Port 22 and 6443 rules have destination “Anywhere-IPv4”.
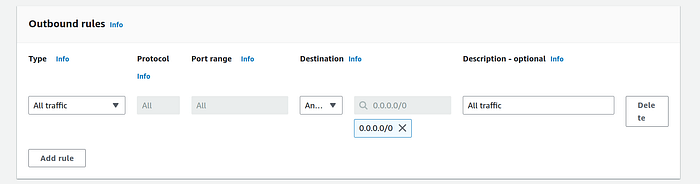
5. Add an outbound rule of all traffic (destination “Anywhere-IPv4”)
6. Click on “Create security group” and then create a new security group for worker nodes.
7. Give a suitable name like “workers-sg”, and choose your VPC.
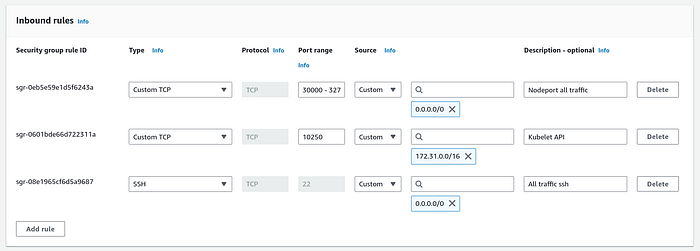
8. Add three Inbound rules
- SSH — port 22 so that we can ssh from our local machine to all worker nodes
- TCP -port 10250 with your VPC CIDR block
- TCP -port range 30000–32767 with the source as anywhere IPv4.

If you are not familiar with specific ports and protocols, consider creating a single security group. Set both Inbound and Outbound traffic sources to ‘Anywhere-IPv4,’ and use this same security group for the control plane and worker nodes.
Launch EC2 instances
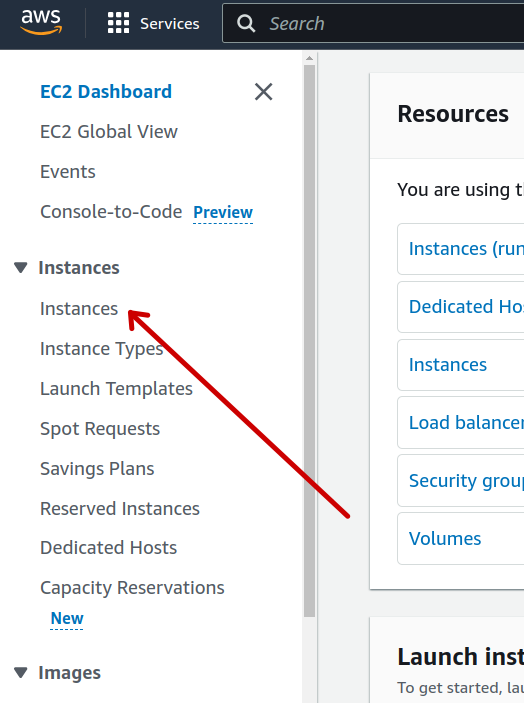
Search ec2 in search bar and click on EC2 service.

Click on ‘Instances’ from left hand side vertical menu and then on the “Launch Instances” orange button.
Control Plane Node
We want an Ubuntu OS running on t2.medium with our pre-created security group for control plane and we will give this instance 12 GiB of storage.
- Give an optional suitable name (tag) to the instance and select “Ubuntu” from OS panel. At the time of writing this, AWS auto selected Ubuntu Server 22.04 LTS image, and we will proceed with that.

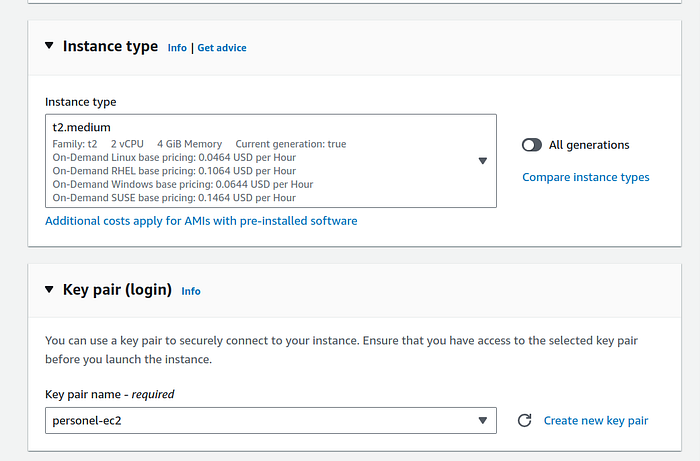
2. Under instance type section select t2.medium that has 2 vCPU and 4 GiB Memory. Create a new key pair, or choose from one of your existing pairs.
Note: An on-demand t2.medium instance costs $0.0464 per hour.
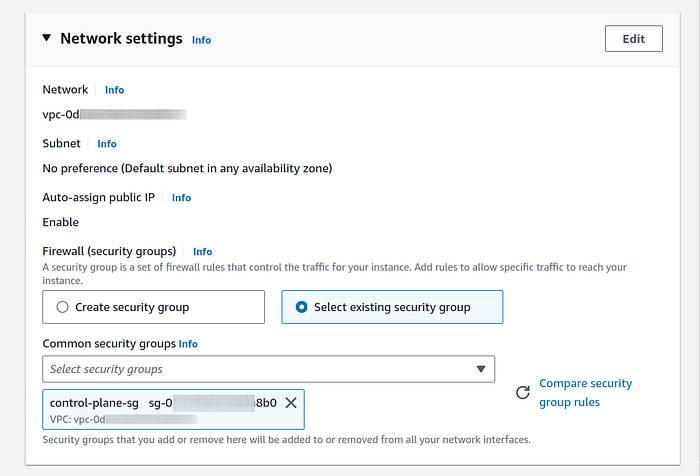
3. Under network setting panel, if you have only 1 VPC then it will be selected by default else change it to your desired VPC by clicking on “Edit” button.
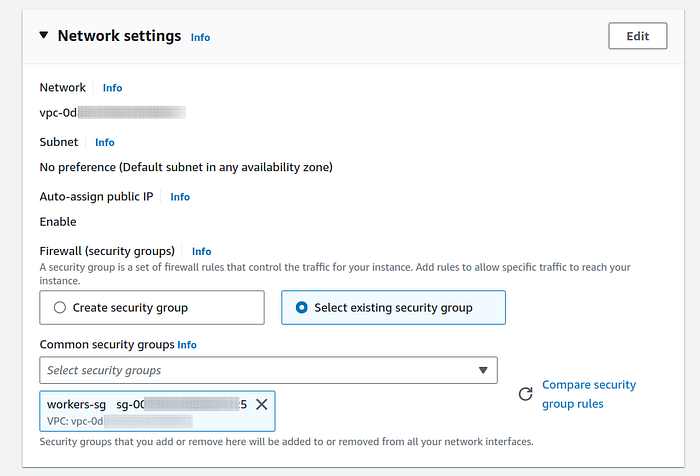
In the same panel, under Firewall (security groups) setting, click on “Select existing security group” radio option and below that select the security group that we created for control plane. If you created only 1 security group with wildcard then please select that.
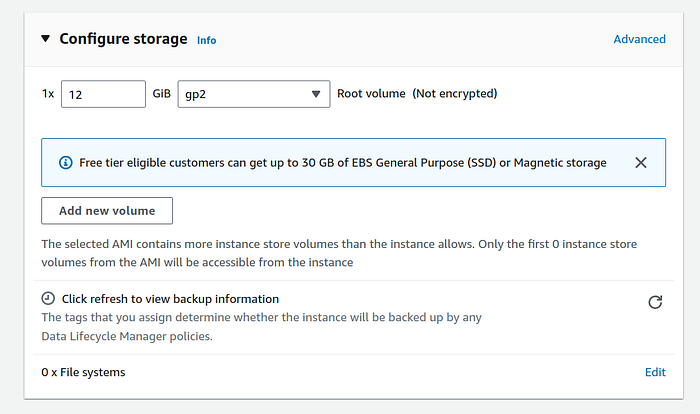
4. Under configure storage panel, I selected 12 GiB of gp2 storage. I did that because our 2 more worker nodes will have at 8 + 8 GiB, making our aggregated cluster memory consumption less than 30 GiB. You can go higher and lower without any problems for this demo.
After verifying all details, click on “Launch instance” orange button.
Worker Nodes
- For worker nodes, don’t give a name instead change ‘Number of instances’ to 2 in Summary section.
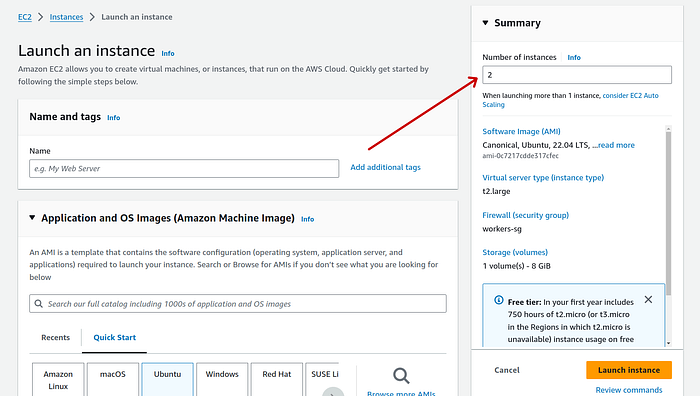
OS will be “Ubuntu”, same as what we selected for control plane node.
2. In instance type panel, I selected t2.large just for demonstration. However depending on your app(s) t2.micro should also be able to hold well.
You can check the memory load on any node with kubectl describe node -n NODE_NAME command.
3. Select one of your existing key pair to be able to ssh from your local machine. You can also skip this and use EC2 Connect to ssh using your web browser.
3. Under network settings panel, click on “Select existing security group” just like we did while launching instance for control plane. Select the security group created for worker node or choose the sg that you created for all traffic.
4. Under configure storage panel I chose 8 GiB of storage, you can go higher as you deem fit.
Whenever you are ready click on “Launch instance” orange button.
Now go back to Instances list page and rename worker nodes for easier identification.
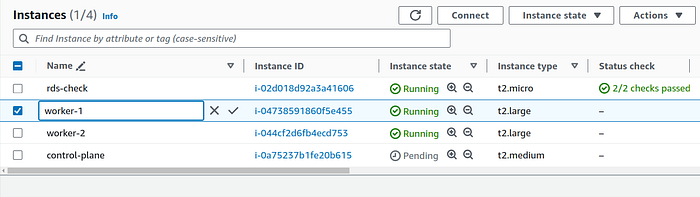
Note: these names are just tags and they do not reflect the actual host names that are used by Kubernetes. We will give host names in the next section.
Installing CRI, kubeadm, kubelet and kubectl
SSH into instances
- You can move your ec2 key pair to
~/.ssh/KEY_NAME.pemorcdinto the directory that has that key. - If you are using this key for the first time then it will have read and write permission so we will have to change permissions before using it. Execute the following command:
chmod 400 KEY_DIR/KEY_NAME.pemYour key permission must reflect like below:
-r--------2. Copy the public IP of each of the three servers and replace them in the following command along with your key:
ssh -i KEY_NAME.pem ubuntu@PUBLIC_IP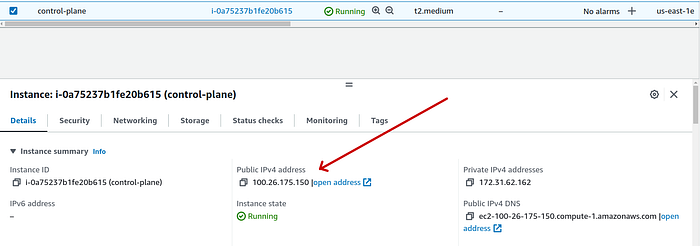

In new terminal tabs you can ssh similarly into both worker nodes.
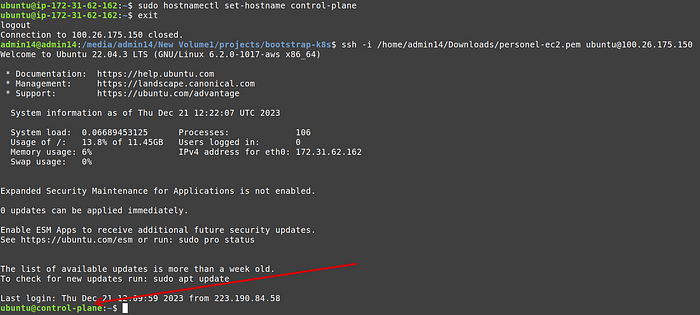
3. At this time it is difficult to identify the nodes with IP address in the terminal, so we will give them host names but first we must turn swap off. Swap off is required by Kubernetes.
Run the following command in all three nodes:
sudo swapoff -a4. [Optional] Now we will add ip to host name mapping in the hosts file of all three nodes.
Edit the /etc/hosts file and add the public ip and a suitable host name at the end of the file in all three nodes.
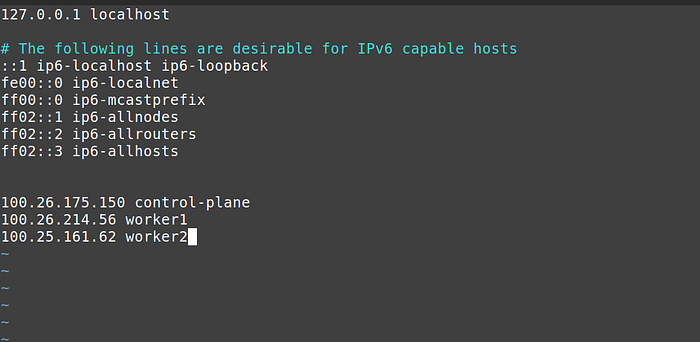
You must make sure that the last three lines in /etc/hosts file are same on every node.

Why not give master name instead of control-plane?
Responsible language — The text in this article follows guidelines issued by the Inclusive Naming Initiative which promotes responsible language and tries to avoid harmful terms. As an example, the Kubernetes project has replaced the potentially harmful term “master” with “control plane node”. This articles does the same.
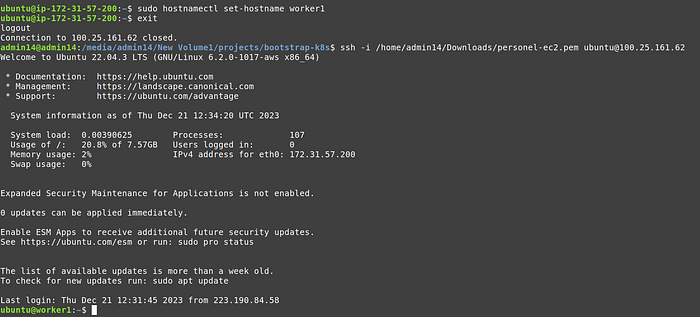
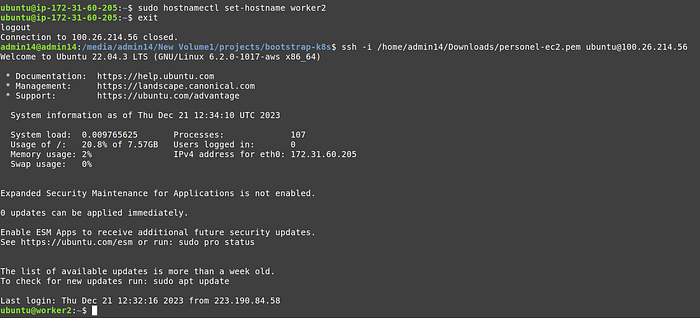
5. [Optional] In the terminal we will replace the ip with a friendly host name. Run the following command, but replace control-plane with worker1 and worker2 , when running in respective terminals.
6. Not exit and ssh again, you should see the host name instead of ip.
Worker 1 terminal:
Worker 2 terminal:
Install a container runtime
To run containers in Pods, Kubernetes uses a container runtime.
By default, Kubernetes uses the Container Runtime Interface (CRI) to interface with your chosen container runtime.
If you don’t specify a runtime, kubeadm automatically tries to detect an installed container runtime by scanning through a list of known endpoints.
If multiple or no container runtimes are detected kubeadm will throw an error and will request that you specify which one you want to use.
Some of the container runtimes:
- containerd (pronounced container-dee)
- CRI-O
- Docker Engine (using cri-dockerd)
In this demo we will install containerd.
To make things simple, I prepared an automated script based on official documentation that will install containerd in all three nodes.
Note: run sudo apt-get update in all three nodes before executing next commands.
- Create a new
containerd-install.shfile in all three nodes and paste the above gist contents.
vim ./containerd-install.sh2. Make the file executable
chmod u+x ./containerd-install.sh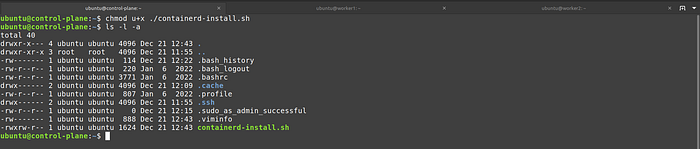
3. Execute the file
4. Check status of containerd, it should be “active”
service containerd status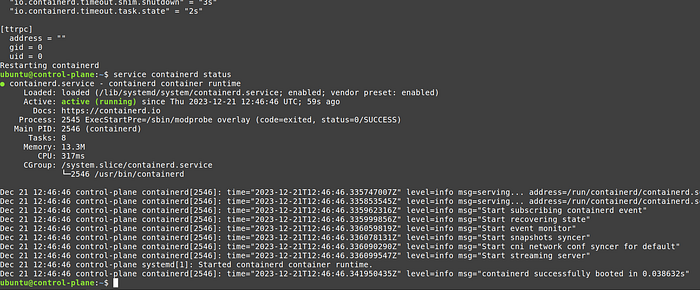
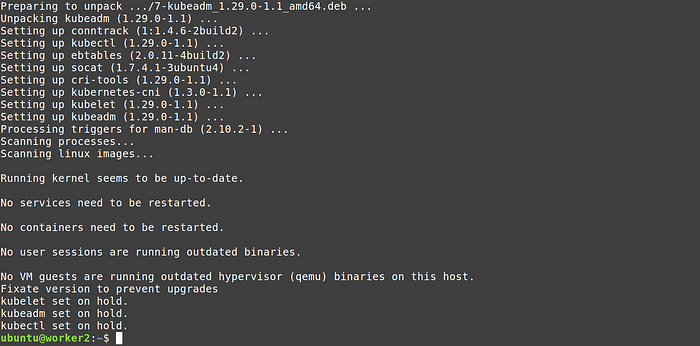
Install kubeadm, kubelet and kubectl
I prepared a similar script to install kubeadm, kubelet and kubectl in all three nodes.
- Create a new
k8s-install.shfile in all three nodes and paste the contents of above gist.
vim ./k8s-install.sh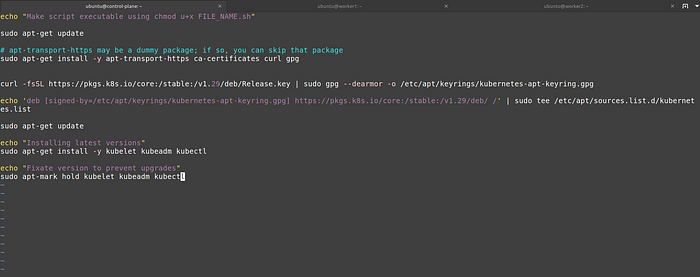
2. Make it executable
chmod u+x ./k8s-install.sh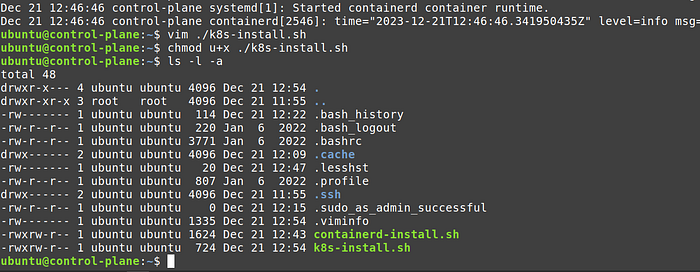
3. Execute the script in all three nodes
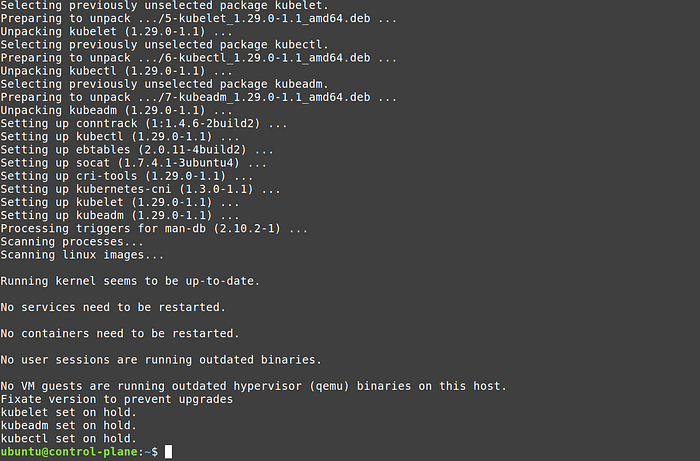

4. Test it with the command
kubeadm version
At this point kubelet service should be inactive because we haven’t initialised the cluster. Confirm it with the following command:
service kubelet status
Congratulations on getting so far, give yourself a pat on the back )
Initialise Cluster
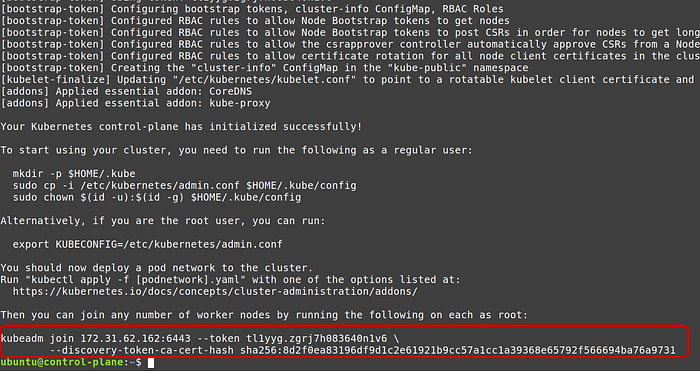
From the control plane node, please run
sudo kubeadm init
Once it finishes executing, copy the commands after “To start using your cluster, you need to run the following as a regular user:” line
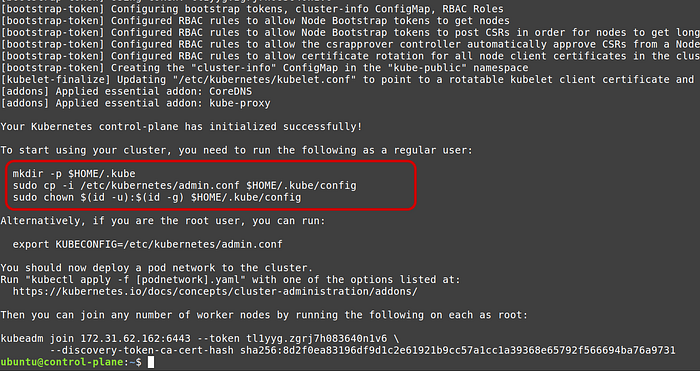
When we will execute commands using kubectl , kubectl will look for certificates in the configuration file at ~/.kube/config location. But kubernetes puts the default admin config file in /etc/kubernetes/admin.conf location.
The above commands copies the files from kubernetes default location and copies them to ~/.kube/config file (and also gives current user permissions).
mkdir -p $HOME/.kube
sudo cp -i /etc/kubernetes/admin.conf $HOME/.kube/config
sudo chown $(id -u):$(id -g) $HOME/.kube/config
If you do not want to persist the config file between server restarts using above commands then you must follow the below synax for every kubectl command (which is adding suffix --kubeconfig /etc/kubernetes/admin.conf ):
sudo kubectl -n kube-system get pod --kubeconfig /etc/kubernetes/admin.confNote: also copy kubeadm join command in the last line from the output of sudo kubeadm init.
Check the status of the static pods
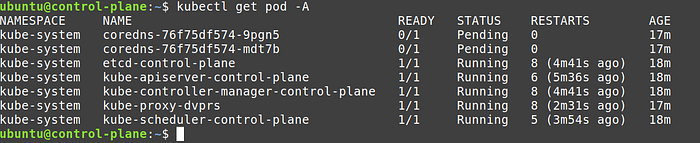
kubectl get pod -AAt this point, if you’re fortunate, the API server should respond. However, after a while or immediately, it might throw a “connection refused” or “incorrect host” error.
During container restarts, when the kubelet is attempting to revive crashed containers, accessing the logs of core components and resource like the API server or etcd server may only display a “pod sandbox changed” error.
The ability to access kubelet and containerd logs occurs when the API server pod doesn’t respond because, at that juncture, the cluster becomes inaccessible. In the backend, the kubelet continually restarts the pods.
If any of your ‘get pod’ commands are successful, you’ll notice the number of restarts or crash loops for all pods in the kube-system namespace.
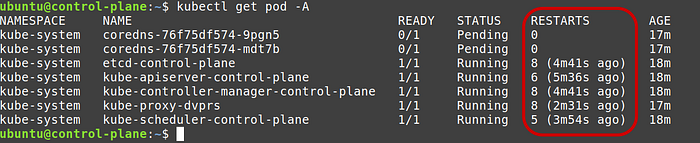
It didn’t used to be like that before, but if you are working with the same stack as described in this article, your static pods may also be experiencing failures and throwing the “pod sandbox changed” error.
Fix cluster (by fixing containerd)
Numerous online solutions address the “pod sandbox changed” error, but most of them focus on generic issues such as incorrect hostnames, memory or storage pressure, and networking errors.
In our particular scenario, this is not the case. However, when similar errors occur, and containers are also failing, the kubelet will persistently restart them. In such instances, we can uncover at least one clue in the haystack by examining the error logs.
As per the github’s containerd installation instructions:
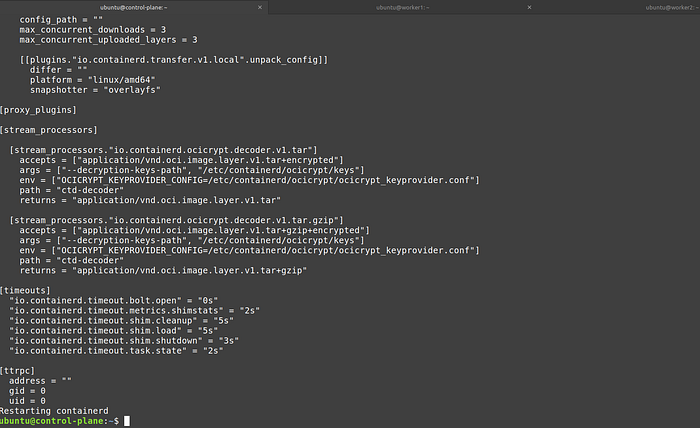
While containerd and Kubernetes use the legacy
cgroupfsdriver for managing cgroups by default, it is recommended to use thesystemddriver on systemd-based hosts for compliance of the "single-writer" rule of cgroups.To configure containerd to use the
systemddriver, set the following option in/etc/containerd/config.toml:
version = 2
[plugins."io.containerd.grpc.v1.cri".containerd.runtimes.runc.options]
  SystemdCgroup = true
And this github issue on the same error also referred to the above documentation page.
So we will apply this fix, which bascially means we will default to systemd driver in our containerd runtime which kubernetes already expects.
- Edit
/etc/containerd/config.tomlfile from control plane node
sudo vim /etc/containerd/config.toml2. Change the SystemCgroup key from false to true under plugins object

Note: In later section we will need to apply the exact same fix to both worker nodes.
3. Restart containerd and kubelet services
sudo service containerd restart
sudo service kubelet restart
Now when you will run kubctl commands, the api server will always respond, plus container restart counts should not increase.
Note: the number of restarts, was because of the containerd conf file. Kubelet can only try to restart the container, it is not responsible for container runtime.
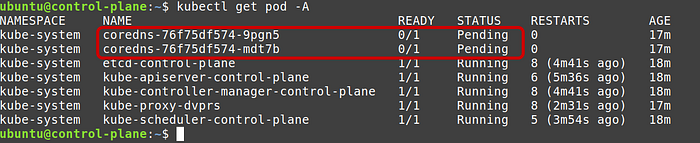
You will notice now that none of the core-dns pods are running. It is because we haven’t deployed a pod network yet. So let’s deploy one.
Deploy CNI Weave net
Weave Net is a popular Kubernetes add-on that provides networking and network policy solutions for containerized applications. It facilitates communication between containers across different hosts, creating a virtual network overlay.
Weave Net offers features like DNS-based service discovery, automatic IP address management, and encryption for communication between containers. It is a much better then using route tables.

Alternative networking solutions for Kubernetes include Flannel, Calico, Cilium and others.
Add ports in security groups
As per the documentation weave net requires TCP 6783 and UDP 6783/6784 to be open in the firewall. So we must add them in our inbound rules in security group of control plane and worker.
Final security group of control plane:
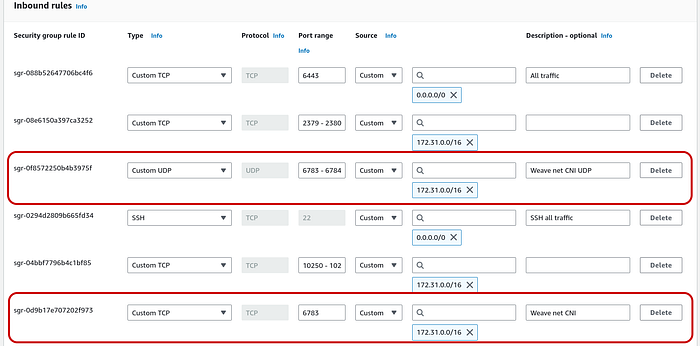
Final security group of worker nodes:

Apply weave net
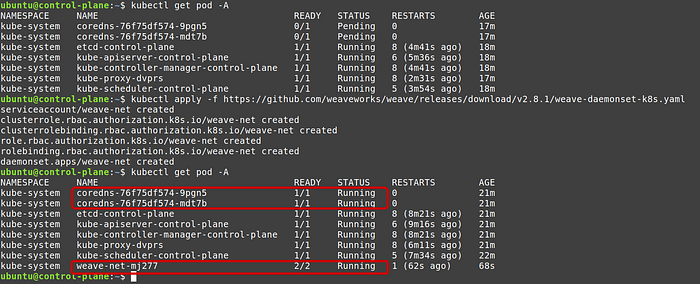
From the documentation execute the following command:
kubectl apply -f https://github.com/weaveworks/weave/releases/download/v2.8.1/weave-daemonset-k8s.yamlNow if you will run kubectl get pod -A , you will see that not only coredns pods are up but 2 new weave nets pods are created.
So far, we have a stable control plane with pod networking. Now we need to add worker nodes and see if control plane can deploy them to both worker nodes successfully before deploying ingress service.
Good job on getting so far :)
Join worker nodes
Fix containerd
To prevent crash loop containers, we will apply the same fix to containerd conf file that we did in control plane node.
- Edit
/etc/containerd/config.tomlfile from control plane node
sudo vim /etc/containerd/config.toml2. Change the SystemCgroup key from false to true under plugins object
Join worker nodes
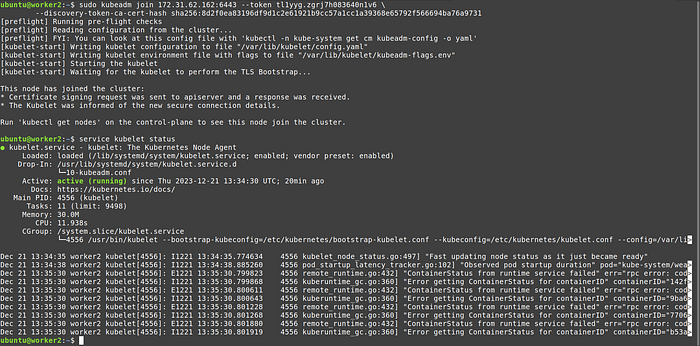
When we executed sudo kubeadm init command, at the end of the verbose output, kubeadm gave a joining commands for the worker nodes.
If you missed that command then you can generate join command again by executing the following command from control plane:
kubeadm token create --print-join-command
Copy the command and paste it in the terminal of both worker nodes one by one.
Check worker nodes cluster joining status
When we executed kubeadm join command on both worker nodes, our control plane took hold of both worker nodes and started kube-proxy pods.
kube-proxy is responsible for analysing whether a new pod/deployment manifest received from api server, can be started on the node or not. If it can be then it passes the conf to container runtime. If node do not has enough resources to deploy the resource then it will inform the same to the control plane.
Check whether kube-proxy pods are running on both worker nodes or not by executing the following command from control plane node:
kubectl get pod -A -o wide
You should see that each of the worker nodes has one kube-proxy pod running.
We also see weave net pods running on both worker nodes.
kubectl get pod -A -o wide | grep weave-net
Note: We don’t have to apply the same weave net yaml file in worker nodes that we applied on control plane.
We can also check kubelet service on both worker nodes, earlier it was in inactive state, but now after kubeadm join command it should be running:

Note: kubectl commands like get pod, get node will not work on any of the worker nodes.
Let’s check weave net container logs from control plane:
kubectl logs -n kube-system weave-net-mkm6d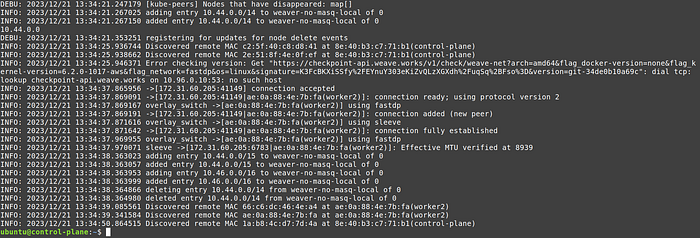
Test nginx static pods
Now we can test whether our apps can be deployed onboth worker nodes or not. If you have come so far and observed no errors then there is no reason for worker nodes to not run your deployments.
Run a test nginx pod
kubectl run test --image=nginxGet pods without -A or namespace flag
kubectl get pod -o wide
Now let’s deploy another nginx pod to test worker 2 node.
Note: control plane will automatically run it the new pod on worker2 to balance the cluster
kubectl run test2 --image=nginxCheck pods
kubectl get pod -o wide
Congratulations, our control plane and both the worker nodes are working as intended.
Deploy ingress
In Kubernetes, an Ingress is an API object that manages external access to services within a cluster. It serves as a way to expose HTTP and HTTPS routes to applications, allowing external traffic to reach services based on specified rules. In comparison to other service types like LoadBalancer and NodePort, Ingress provides more advanced routing capabilities and is especially suited for managing HTTP/S traffic.
LoadBalancer vs. Ingress:
- LoadBalancer typically works at the service level and requires cloud-provider integration. It provisions an external load balancer to distribute traffic to the associated services.
- Ingress provides HTTP/S routing and allows more sophisticated path-based and host-based routing rules. It does not create an external load balancer by itself but can leverage an existing one.
NodePort vs. Ingress:
- Exposes a service on a static port on each cluster node, making the service accessible externally but only on specific node ports.
- Suitable for scenarios where external access is required, but without the advanced routing capabilities provided by Ingress.
How Ingress Works
Ingress Resource:
- Users define Ingress rules in Kubernetes using the Ingress resource. Rules specify the backend services, paths, and hostnames for routing.
Ingress Controller:
- An Ingress Controller, a software component deployed in the cluster, interprets and enforces Ingress rules. It could be Nginx, Traefik, or another controller depending on the choice made.
Routing:
- Ingress controllers manage external access by routing incoming requests based on defined rules to the appropriate services within the cluster.
Installing Ingress Controller using Helm
There are multiple ways to install the Ingress-Nginx Controller:
- with Helm, using the project repository chart
- with
kubectl apply, using YAML manifests - with specific addons (e.g. for minikube or MicroK8s)
We will install ingress-nginx controller using helm.
Helm, a Kubernetes package manager, simplifies the installation of an Ingress Controller. Users can use Helm charts provided by the Ingress Controller project to deploy and configure the controller in the cluster.
- For cloud-managed Kubernetes clusters like AWS EKS or GCP GKE, they often come with their own native Ingress controllers.
- AWS EKS, for instance, can integrate with AWS Network Load Balancer (NLB) for external access.
- GCP GKE uses the GKE Ingress controller to handle external traffic routing.
- And if your on service mesh, then you don’t need to use ingress.
Install Helm
The helm official documentation provides an apt-get installation method for ubuntu OS, and we will use that:
curl https://baltocdn.com/helm/signing.asc | gpg --dearmor | sudo tee /usr/share/keyrings/helm.gpg > /dev/null
sudo apt-get install apt-transport-https --yes
echo "deb [arch=$(dpkg --print-architecture) signed-by=/usr/share/keyrings/helm.gpg] https://baltocdn.com/helm/stable/debian/ all main" | sudo tee /etc/apt/sources.list.d/helm-stable-debian.list
sudo apt-get update
sudo apt-get install helm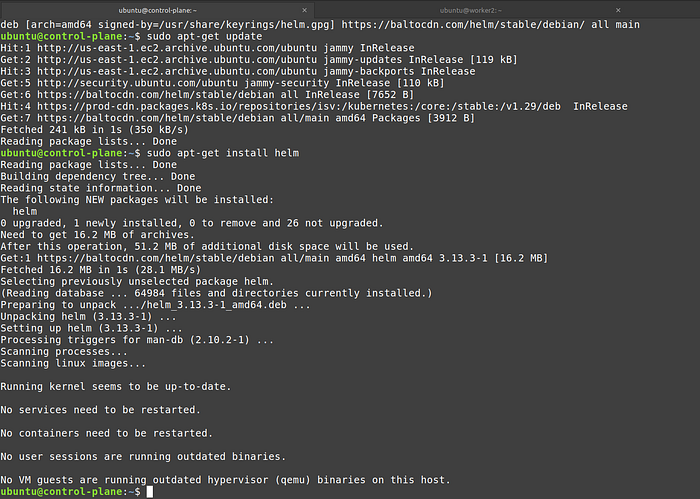
Inspect installation by executing command helm version

Deploy ingress-nginx controller
Use the following commands from the official kubernetes ingress-nginx github repo:
helm upgrade --install ingress-nginx ingress-nginx \
  --repo https://kubernetes.github.io/ingress-nginx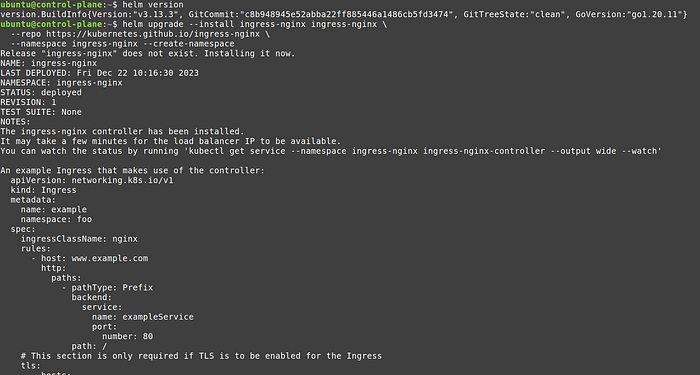
List the services
kubectl get svc
Check the pods
kubectl get pod -o wide
Note: We are not deploying LoadBalancer, so our ingress will only be accessible using node ip.
Deploy a path based ingress service
In this example we will deploy a path based ingress service. You can modify the below yaml to deploy a host based service too.
Above file is taken from minikube example and can also be downloaded from : https://storage.googleapis.com/minikube-site-examples/ingress-example.yaml
In the yaml file we have:
- 2 static pods (static means without any controllers)
- 2 ClusterIP services, one for each pod (if don’t mention NodePort or LoadBalancer then service defaults to ClusterIP)
- One Ingress service called
example-ingress

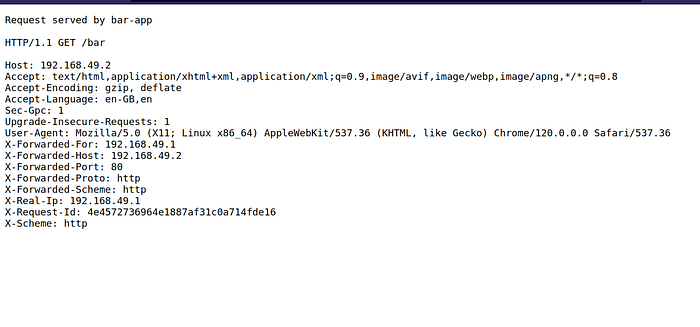
The example-ingress service has two paths /foo and /bar , each forwarding requests to pod services foo-service and bar-service , both on port 8080.
The foo-service and bar-service are listening on port 8080 and directing requests to pods that have labels app: foo and app: bar respectively.
Deploy ingress service
kubectl apply -f https://storage.googleapis.com/minikube-site-examples/ingress-example.yaml
Check services
kubectl get svc
Pods
Access service from inside the cluster
Copy the node ip of the cluster and invoke the following command
curl CLUSTER_IP/foo
curl CLUSTER_IP/bar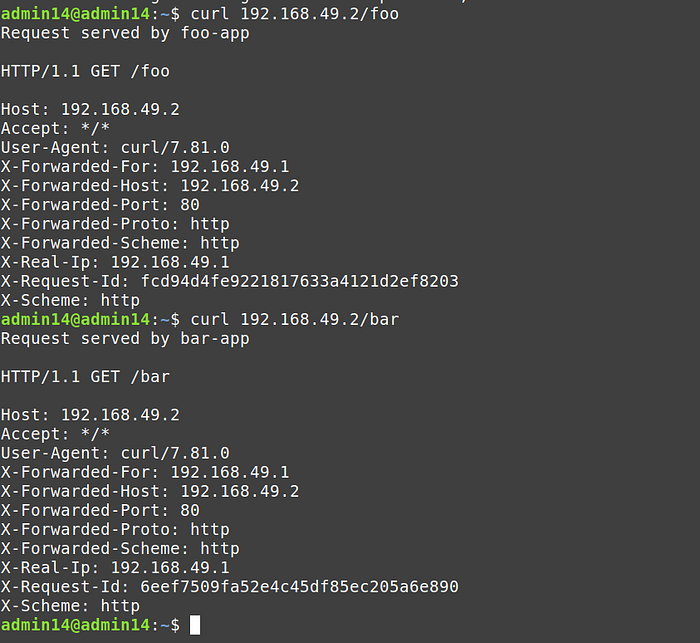
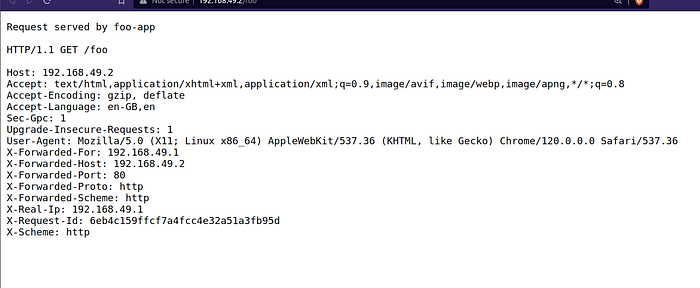
Access service from outside the cluster
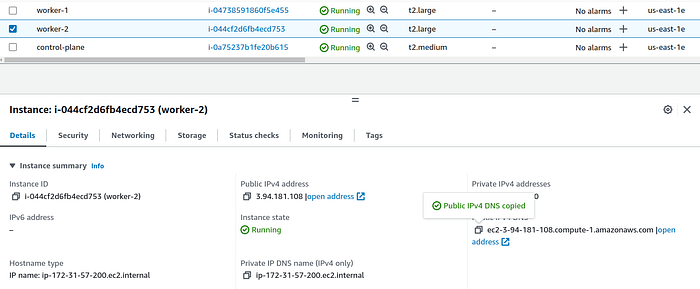
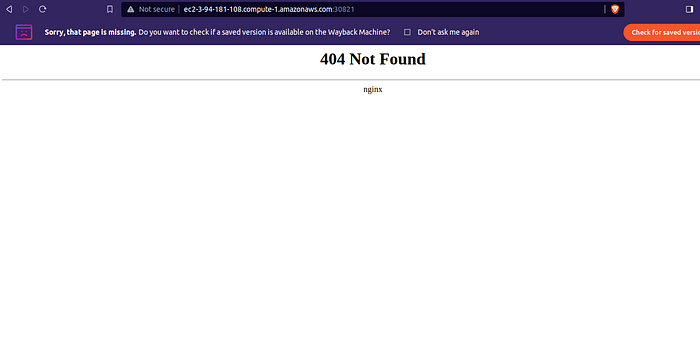
To access our ingress-nginx service from outside the cluster we will need to a add a application load balancer and add our worker nodes in its target group.

After that we can copy the Fully Qualified Domain Name (FQDN) of any of the worker nodes, and pass either /foo or /bar in the URL.
Example of /foo path:
Example of /bar path:
Note: the root URL will be unavailable.
How worker 2 responds when only worker node 1 has ingress nginx pods?
That happens due to service discovery. In a setup with an Ingress service and a NodePort service (without a LoadBalancer), when a request is made, it reaches one of the worker nodes’ IP addresses with the designated NodePort.
The Ingress Controller deployed within the Kubernetes cluster, residing on the chosen node, interprets the request based on rules defined in the Ingress resource and routes the traffic to the appropriate backend service. Subsequently, the NodePort service, which allocates a static port on each node, directs the request to the specific worker node and pod running the application, facilitating external access without the need for an external LoadBalancer.
Congratulations! You have successfully deployed a bootstrap kubernetes cluster and added ingress service for path based routing.
Deploy other apps like ml models, analytical apps, using kubernetes manifests and monitor your cluster using Kubernetes dashboard.
kubectl apply -f https://raw.githubusercontent.com/kubernetes/dashboard/v2.7.0/aio/deploy/recommended.yaml
Use cases for data science
Bootstrapping your own Kubernetes cluster on EC2 instances with Ingress service empowers data scientists and machine learning engineers to efficiently test various models and assess their scalability.
For instance, using Ingress path-based routing, you can easily evaluate different machine learning models by directing traffic to specific versions or instances for comparative analysis.
Additionally, this cluster facilitates seamless experimentation with distributed training, data processing, and real-time analytics, offering practical applied examples such as deploying scalable data pipelines, conducting resource-intensive simulations, and customizing data services tailored to specific research needs.
Besides all the help one can get from such an arrangement, it is a phenomenal undertaking to understand how kubernetes works under the hood.
We have barely scratched the surface in this article because we did not deploy any stateful sets, set up RBAC, used any jump pods or even touched upon many production essential kubernetes resources. But you can play around with your cluster at your own time and stop all the instances when required. Just edit the ip address of all nodes in /etc/hosts file on all nodes after reboot to take advantage of the node names.
You can connect with me on linkedin: https://linkedin.com/in/maheshrajput
Github repo that has containerd-install.sh, k8s-install.sh and ingress-example.yaml files: